JR6PUE HOME PAGE
JR6PUE HOME PAGE
8.DVmegaをGPIO接続で使う 1
DVmegaをRaspberry pi 3にGPIO接続して、ファームウェアを変更しました。
RaspberryPi1B,Pi2Bでは,UART0がGPIOヘッダーに使われています。
*注:UART( Universal Asynchronous Receiver Transmitter )
シリアル信号をパラレル信号に変換したり、その逆でパラレル信号を
シリアル信号に変換したりする通信回路
Raspberry Pi3B,ZeroWでは,WifiとBluetoothが搭載されたので仕様が変更されています。
この影響でこれまで簡単だったGPIO接続でBlueDVを使う方法が少し複雑になっています。
私は、これにはまりGPIO接続でBlueDVが使えるようになるまで10時間くらいかかりました。
さらに、現在使われているBlueDV-09488-preBETA-Linux.zip 2018-02-23 21:42 2.6Mでは、
私の環境だけかもしれませんが。BlueDVの設定ファイルを自力で書き換えないとダメなようです。
ま、使えるので良しとしていますし新しいバージョンになるのを期待しています。(2018.6.30)
1.ファームウェアをバージョンアップ
手持ちのDVmegaのファームウェアが3.14JPと少し古いのでこれを機に、まずは、最新版の3.19JPに
変更しておきました。
PC-インターフェース版のDVmegaをGPIO接続できるようにばらしました。
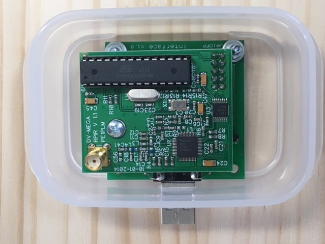
USBシリアルインターフェースを取り外し、DVmegaをRaspberry pi ZEROに接続して
pi-starを動かしてみます。簡単に動きましたので、BlueDVも簡単に動くだろうと思ったのですが....
はまりました。。(^^;
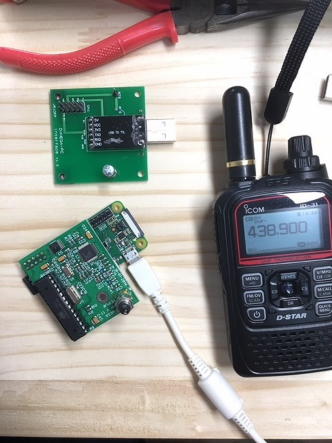
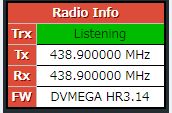
せっかくなので、現在DVmegaのファームウェアが3.14JPと古いので
変更してみます。
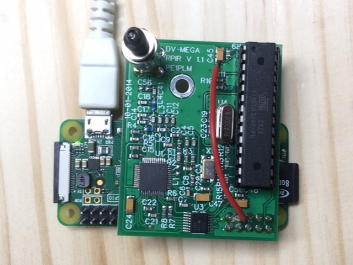
そのためには、ジャンパー線が必要です。
ATMEGA328のリセットピン(C45下部)とGPIOコネクタの7番ピンの間にジャンパケーブルを半田付けが
必要です。
以下を参考に接続しました。
参考にしたHP
https://todovc.blogspot.com/2016/05/raspbian-jessie-dvmega.html?m=1
https://g0wfv.wordpress.com/how-to-update-dvmega-firmware-without-a-programmer-or-an-arduino/
https://g0wfv.wordpress.com/how-to-mmdvmhost-with-a-dvmega/#getty
OSは、Jessieを使いました。2017-04-10-raspbian-jessie
upデートすれば最新版になりますがHPに従って挑戦(^^;
というか、いろいろ試しても上手くいかなかったのです。
ですから、こんな時はホームページで紹介されているとおりやるのが基本です。
一度動けば、何が悪いのかわかります。
pi@DVmega:~ $ lsb_release -a
No LSB modules are available.
Distributor ID: Raspbian
Description: Raspbian GNU/Linux 8.0 (jessie)
Release: 8.0
Codename: jessie
pi@DVmega:~ $
sudo apt-get update && sudo apt-get upgrade -y
sudo apt-get install avrdude
$ sudo apt-get install git python-dev python-rpi.gpio
$ git clone https://github.com/openenergymonitor/avrdude-rpi.git
$ cd avrdude-rpi
$ sudo cp autoreset /usr/bin
$ sudo cp avrdude-autoreset /usr/bin
$ sudo mv /usr/bin/avrdude /usr/bin/avrdude-original
$ sudo ln -s /usr/bin/avrdude-autoreset /usr/bin/avrdude
ここを参考にttyAMA0を使用できるように設定
sudo apt-get update
sudo apt-get install git
cd ~/Downloads
git clone https://github.com/g4klx/MMDVMHost.git
cd MMDVMHost
sudo apt-get update
sudo apt-get install build-essential
cd MMDVMHost
make
nano MMDVM.ini
Modemの項目でttyAMA0をいかして保存
[Modem]
# Port=/dev/ttyACM0
Port=/dev/ttyAMA0
#Port=\\.\COM3
sudo systemctl stop serial-getty@ttyAMA0.service
sudo systemctl disable serial-getty@ttyAMA0.service
nano /boot/cmdline.txt
console=serial0,115200を削除
On the Raspberry Pi 3 ONLY, disable built-in Bluetooth…
sudo bash -c 'echo "dtoverlay=pi3-disable-bt" >> /boot/config.txt'
sudo reboot
sambaをインストールしておくと簡単にファイルをコピーできます。
USBメモリーにコピーしてラズパイに移しても簡単ですね。
ここから~/avrdude-rpiにDVMEGA_RH_V319_JAPAN.zipファームウェアをダウンロードしてunzipで解凍
pi@DVmega:~/avrdude-rpi $ ls -l
合計 132
-rw-r--r-- 1 pi pi 1791 1月 2 21:21 Changelog.txt
-rwxr--r-- 1 pi pi 26041 6月 11 21:27 DVMEGA_RH_V319_JAPAN.zip
-rw-r--r-- 1 pi pi 85951 1月 2 21:27 DVMEGA_RH_V319_UNO_JP.hex
-rw-r--r-- 1 pi pi 1694 6月 11 21:23 README.md
-rwxr-xr-x 1 pi pi 978 6月 11 21:23 autoreset
-rwxr-xr-x 1 pi pi 76 6月 11 21:23 avrdude-autoreset
-rwxr-xr-x 1 pi pi 349 6月 11 21:23 install
pi@DVmega:~/avrdude-rpi $
pi@DVmega:~/avrdude-rpi $ avrdude -p m328p -c arduino -P /dev/ttyAMA0 -b 115200 -F -U DVMEGA_RH_V319_UNO_JP.hex -v
紹介されているコマンドが上記のようになります。
avrdude -p m328p -c arduino -P /dev/ttyAMA0 -b 115200 -F -U flash:w:<filename> -v
このように紹介されています。flash:w:<filename>の書き方(ファイルを置く場所)に試行錯誤でした。
flash:w:とかいらないんです。これがわからなくて、だいぶ苦労しました。
avrdude-original: Version 6.1, compiled on Jul 7 2015 at 10:29:47
Copyright (c) 2000-2005 Brian Dean, http://www.bdmicro.com/
Copyright (c) 2007-2014 Joerg Wunsch
System wide configuration file is "/etc/avrdude.conf"
User configuration file is "/root/.avrduderc"
User configuration file does not exist or is not a regular file, skipping
Using Port : /dev/ttyAMA0
Using Programmer : arduino
Overriding Baud Rate : 115200
avrdude-original: Using autoreset DTR on GPIO Pin 7
AVR Part : ATmega328P
Chip Erase delay : 9000 us
PAGEL : PD7
BS2 : PC2
RESET disposition : dedicated
RETRY pulse : SCK
serial program mode : yes
parallel program mode : yes
Timeout : 200
StabDelay : 100
CmdexeDelay : 25
SyncLoops : 32
ByteDelay : 0
PollIndex : 3
PollValue : 0x53
Memory Detail :
Block Poll Page Polled
Memory Type Mode Delay Size Indx Paged Size Size #Pages MinW MaxW ReadBack
----------- ---- ----- ----- ---- ------ ------ ---- ------ ----- ----- ---------
eeprom 65 20 4 0 no 1024 4 0 3600 3600 0xff 0xff
flash 65 6 128 0 yes 32768 128 256 4500 4500 0xff 0xff
lfuse 0 0 0 0 no 1 0 0 4500 4500 0x00 0x00
hfuse 0 0 0 0 no 1 0 0 4500 4500 0x00 0x00
efuse 0 0 0 0 no 1 0 0 4500 4500 0x00 0x00
lock 0 0 0 0 no 1 0 0 4500 4500 0x00 0x00
calibration 0 0 0 0 no 1 0 0 0 0 0x00 0x00
signature 0 0 0 0 no 3 0 0 0 0 0x00 0x00
Programmer Type : Arduino
Description : Arduino
Hardware Version: 3
Firmware Version: 4.4
Vtarget : 0.3 V
Varef : 0.3 V
Oscillator : 28.800 kHz
SCK period : 3.3 us
avrdude-original: AVR device initialized and ready to accept instructions
Reading | ################################################## | 100% 0.00s
avrdude-original: Device signature = 0x1e950f
avrdude-original: safemode: lfuse reads as 0
avrdude-original: safemode: hfuse reads as 0
avrdude-original: safemode: efuse reads as 0
avrdude-original: NOTE: "flash" memory has been specified, an erase cycle will be performed
To disable this feature, specify the -D option.
avrdude-original: erasing chip
avrdude-original: reading input file "DVMEGA_RH_V319_UNO_JP.hex"
avrdude-original: input file DVMEGA_RH_V319_UNO_JP.hex auto detected as Intel Hex
avrdude-original: writing flash (30554 bytes):
Writing | ################################################## | 100% 4.29s
avrdude-original: 30554 bytes of flash written
avrdude-original: verifying flash memory against DVMEGA_RH_V319_UNO_JP.hex:
avrdude-original: load data flash data from input file DVMEGA_RH_V319_UNO_JP.hex:
avrdude-original: input file DVMEGA_RH_V319_UNO_JP.hex auto detected as Intel Hex
avrdude-original: input file DVMEGA_RH_V319_UNO_JP.hex contains 30554 bytes
avrdude-original: reading on-chip flash data:
Reading | ################################################## | 100% 3.20s
avrdude-original: verifying ...
avrdude-original: 30554 bytes of flash verified
avrdude-original: safemode: lfuse reads as 0
avrdude-original: safemode: hfuse reads as 0
avrdude-original: safemode: efuse reads as 0
avrdude-original: safemode: Fuses OK (E:00, H:00, L:00)
strace: |autoreset: Broken pipe
strace: |autoreset: Broken pipe
strace: |autoreset: Broken pipe
strace: |autoreset: Broken pipe
strace: |autoreset: Broken pipe
avrdude-original done. Thank you.
strace: |autoreset: Broken pipe
pi@DVmega:~/avrdude-rpi $
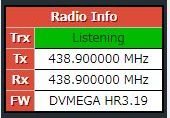
こんなところでこんなに時間がかかるとは。(^^;
8時間超の試行錯誤で成功!!
