JR6PUE HOME PAGE
JR6PUE HOME PAGE
NoraGatewayにダッシュボードをインストール
進化を続けるNoraGatewayですが、とうとう、ダッシュボードが使えるようになりました。\(^o^)/
サーバーは、apacheではなくてnginxを使っています。
NoraGateway本家には、ダッシュボードのインストール方法が詳細に紹介されていますので、本家が紹介した方法で
インストールされていれば、上記ダッシュボードのインストール方法のままで動きました。
そこで、今回は、JR1OFP局が作成したNoraGatewayのイメージファイルにダッシュボードをインストールしてみました。
(2019.07.15)
ダッシュボードが進化していました。
NoraGatewayもNoraGateway v0.1.5a-PR15(2019.11.17現在)になっていて、設定方法が変わっていて
インストールにだいぶ苦労しました。
変更があった部分について、取りまとめてみます。(2019.11.17)
JR1OFP局が作成するイメージはファイルは、初心者の方が簡単にインストールできるように、さまざまな配慮が
なされていますので、ある意味、他の事をしようとすると逆に難しくなっています。(^^;
まず、違うのは簡単にファイルが壊れないように書き込み禁止になっています。
書き込み禁止のままだとダッシュボードが動きませんので、私がわかる方法でこれを止めてSDカードを書き込み状態に
します。ですので、突然電源を落とすとSDカードを壊す頻度は高まるかもしれませんが、イメージのバックアップをとって
おけば、そんなに気にしなくてもいいかもしれません。
気になる場合は、シャットダウンスイッチなどで電源を落とす前にシステムを止めればいいと思います。JR1OFP局のイメージファイルでもシャットダウンスイッチを着ければシステム停止が行われるのですがタイミングで止まらないことがあります。
また、ユーザーがnoraではなくrootで動いています。
この2点を意識して設定を行い、ダッシュボードの動作が確認できたので紹介します。
本日現在(2019.07.15)最新であるNoraGateway v0.1.4a(2019.06.16)が動作している前提です。
1.SDカードの書き込みを許可します。
sudo mount / -o remount,rw
2.NoraGateway.xmlの設定でダッシュボードの使用を許可します。
sudo nano /opt/NoraGateway/config/NoraGateway.xml
*ダッシュボード利用を許可 enable="true"
*ユーザをnoraからroot
一番下に、v1.0.4aから新しく追加された設定の下記2か所を修正します。
<!--
Webダッシュボードサービス(v0.1.4a以降)
※有効にする場合には、enable="true"として下さい
-->
<WebRemoteControlService enable="true" port="3000" context="/root" />
保存します。
3.serverAddressに、ダッシュボードを表示するクライアントデバイスから見たときのIPアドレスを設定
自分が使うJumbospotのIPアドレスを確認しておきます。
私が紹介した方法でOLEDにIPアドレスが出るようにしていればそれを確認すればいいので簡単です。
ここで、モバイルルータを使う時はネットワークアドレスが自宅内のアドレスと違うので、どちらをメインで
使うか検討して対応するといいと思います。
特に、モバイルでスマホ等のブラウザを使ってダッシュボードを確認したい場合は、ラズパイのIPアドレスを
モバイルルータのネットワークアドレス内で固定しておいた方がいいと思います。
とりあえず、今回は、ラズパイのIPアドレスは192.168.100.56としています。DHCPで割り振られる設定のままでも
頻繁にIPアドレスは変わらないのでOLEDにIPアドレスを表示するようにしておけば、下記の設定したアドレスとあって
いるか確認できるので便利です。
なお、DHCPで割り振られたIPアドレスを自動で設定できないかは今後の課題としておきます。(^^;
sudo nano /opt/NoraGateway/dashboard/js/config.js
const serverAddress = "192.168.100.56";
const context = "/root";
const lastHeardLimit = 20;
赤い部分を変更して保存します。
4.ngnixをインストールします
sudo apt install nginx
インストールすると下記エラーメッセージがでますが無視して大丈夫です。
JR1OFP局が作成してくれているイメージファイルでは、このエラーメッセージは出るようです。
Errors were encountered while processing:
dhcpcd5
E: Sub-process /usr/bin/dpkg returned an error code (1)
5./etc/nginx/sites-available/defaultを編集
本家のインストール方法を一度確認下さい。変更箇所のイメージが分かります。
変更だけではなく、設定箇所そのものを追加する箇所もあります。
下記赤い変更箇所の最初の部分は新しく追加します。
本家のインストール方法にあるnoraはrootに変更して追加します。
sudo nano /etc/nginx/sites-available/default
ファイルに追加変更する箇所を赤で表示します。
##
# You should look at the following URL's in order to grasp a solid understanding
# of Nginx configuration files in order to fully unleash the power of Nginx.
# https://www.nginx.com/resources/wiki/start/
# https://www.nginx.com/resources/wiki/start/topics/tutorials/config_pitfalls/
# https://wiki.debian.org/Nginx/DirectoryStructure
#
# In most cases, administrators will remove this file from sites-enabled/ and
# leave it as reference inside of sites-available where it will continue to be
# updated by the nginx packaging team.
#
# This file will automatically load configuration files provided by other
# applications, such as Drupal or Wordpress. These applications will be made
# available underneath a path with that package name, such as /drupal8.
#
# Please see /usr/share/doc/nginx-doc/examples/ for more detailed examples.
##
# Default server configuration
#
map $http_upgrade $connection_upgrade {
default upgrade;
'' close;
}
server {
listen 80 default_server;
listen [::]:80 default_server;
# SSL configuration
#
# listen 443 ssl default_server;
# listen [::]:443 ssl default_server;
#
# Note: You should disable gzip for SSL traffic.
# See: https://bugs.debian.org/773332
#
# Read up on ssl_ciphers to ensure a secure configuration.
# See: https://bugs.debian.org/765782
#
# Self signed certs generated by the ssl-cert package
# Don't use them in a production server!
#
# include snippets/snakeoil.conf;
#以下の部分は、オリジナルサイトでは、root /var/www/html;なっていますが
#下記のように変更しないとダメなようです。
root /opt/NoraGateway/dashboard;
# Add index.php to the list if you are using PHP
index index.html index.htm index.nginx-debian.html;
server_name _;
location / {
# First attempt to serve request as file, then
# as directory, then fall back to displaying a 404.
try_files $uri $uri/ =404;
}
location /root/ {
proxy_pass http://localhost:3000/root/;
proxy_http_version 1.1;
proxy_set_header Upgrade $http_upgrade;
proxy_set_header Connection $connection_upgrade;
}
# pass PHP scripts to FastCGI server
#
#location ~ \.php$ {
# include snippets/fastcgi-php.conf;
#
# # With php-fpm (or other unix sockets):
# fastcgi_pass unix:/var/run/php/php7.0-fpm.sock;
# # With php-cgi (or other tcp sockets):
# fastcgi_pass 127.0.0.1:9000;
#}
# deny access to .htaccess files, if Apache's document root
# concurs with nginx's one
#
#location ~ /\.ht {
# deny all;
#}
}
# Virtual Host configuration for example.com
#
# You can move that to a different file under sites-available/ and symlink that
# to sites-enabled/ to enable it.
#
#server {
# listen 80;
# listen [::]:80;
#
# server_name example.com;
# root /var/www/example.com;
# index index.html;
#
# location / {
# try_files $uri $uri/ =404;
# }
#}
保存します。
6.ngnixの自動起動設定を行います。
自動起動方法はいろいろありますが、これまでは一番簡単な/etc/rc.loclalでよかったのですが、
今回は、うまくいかなかったのでスプリクトファイルで行う事にしました。
とりあえず、rc.localで行う方法とスプリクトファイル方法の2種類の方法を紹介しておきます。
(1)rc.local方法
sudo nano /etc/rc.local
# Wi-Fi Setting
# wfparacp.sh
# IP Adress Setting
# dhcpcd.sh
sudo python /home/pi/Adafruit_Python_SSD1306/examples/stats.py
sudo mount / -o remount,rw
sudo /etc/init.d/nginx start
exit 0
保存します。
(2)スプリクトファイル方法
cd ~
①nginxpi.shファイルを作成します
sudo nano nginxpi.sh
#!/bin/bash
sudo mount / -o remount,rw
sudo /etc/init.d/nginx start
保存
②実行権を付けます
sudo chmod 0755 nginxpi.sh
③nginxpi.serviceを作成
sudo nano /etc/systemd/system/nginxpi.service
[Unit]
Description = nginx daemon
[Service]
ExecStart = /home/pi/nginxpi.sh
Restart = always
Type = simple
[Install]
WantedBy = multi-user.target
保存
④# 自動起動on
sudo systemctl enable nginxpi
以上で再起動します。
起動後は、SDカードは書き込み可能状態になっています。
ファイルのサイズが大きくなりますので、16GBのSDカードを使ったり、
時々、LOGファイルを削除するなど注意が必要です。
7.ダッシュボードにアクセス
NoraGatewayが起動したら、別PCでブラウザを起動しアドレスバーに先ほど設定したIPアドレスを入力します。
http://192.168.100.56
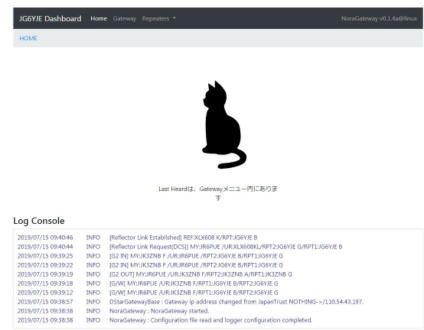
Noraは、やはり猫のイメージなんでしょうね。このシルエット、とても品格があります!!
この表示がでたら大成功です。(2019.07.15)
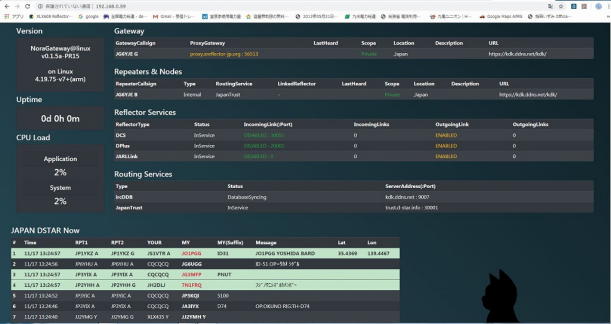
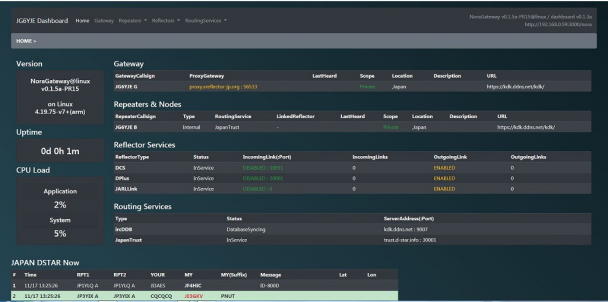
新しいダッシュボードは、こんな感じになりました。
だいぶ情報が見えるようになっています。(2019.11.17)
通常でインストールしたNoraGatewayでダッシュボードをインストールする方法で注意する点
私の場合は、今回、本家のインストール方法で動きませんでしたので、対応した内容を記載しておきます。
1./etc/nginx/sites-available/default
(1)本家 # include snippets/snakeoil.conf;
root /var/www/html;
修正しました
root /opt/NoraGateway/dashboard;
2.起動設定が必要です
(1)rc.local方法
sudo nano /etc/rc.local
# Wi-Fi Setting
# wfparacp.sh
# IP Adress Setting
# dhcpcd.sh
sudo python /home/pi/Adafruit_Python_SSD1306/examples/stats.py
sudo /etc/init.d/nginx start
exit 0
保存します。
JR1OFP局のイメージファイルでないので、
sudo mount / -o remount,rw の書き込み許可は必要ありません。
3.7. ダッシュボードにアクセスを試行
本家 http://nginxが動作しているデバイスのIPアドレス/noradash/
にアクセスを行い、正常に動作しているか確認を行いますとありますが、
アクセスエラーが出て接続できませんでした。
修正 http://デバイスのIPアドレス のみで接続します。(2019.11.17)
