JR6PUE HOME PAGE
JR6PUE HOME PAGE
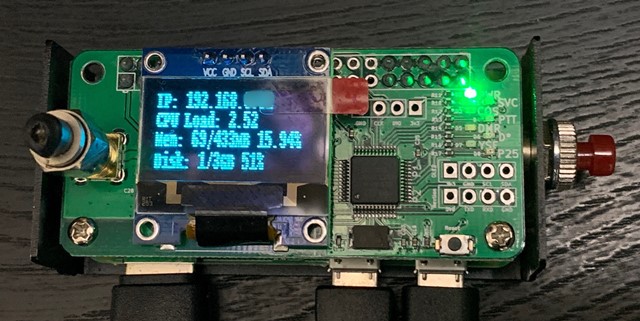
OLED���j�^�[��IP�A�h���X��MyCALL�T�C����\������
�@�@���̊��ł́ARaspberry pi ZERO���NoraGateway+�Ȃ���ă��j�^�[�̗��p�͌��������Ƃ�������܂����B
�@CPU�ւ̕��ׂ������肷���ăP�������o�Ďv���悤�Ɏg���܂���B�������A��x�AJumbospot�ɂ��Ă���OLED�ɕ\����
�@�o��̂�̊�����Ɖ����\�����Ă��Ȃ��̂͂��݂������̂ł��B�l�b�g��T���Ă�����JG3EBB�ǂ̃u���O�Ƀq���g��
�@����܂����B�����ŁANoraGateway�����p�ł���Ƃ����O��ŁAIP�A�h���X�Ǝ����̃R�[���T�C��������\�����邱�Ƃ�
�@�`�������W���邱�Ƃɂ��܂������A����Ȃ����Ƃ�������JG3EBB�ǂɂ��낢��Ƃ����������������܂����B
�@�@�܂��AOLED�̕\���́A�d�����Ȃ���������Ȃ������̂�reboot�������ɃV�F���X�v���N�g���g���āA��x��ʂ�
�@�N���A�ł���悤�ɂ���X�v���N�g�������Ă������܂����B
�@�@���Z�������AJG3EBB�ǂɂ͂��낢��A�h�o�C�X�������肪�Ƃ��������܂����B�S���犴�ӂł��B
�@�@�Ȃ��ANoraGateway�ɂ��ẮAJR1OFP�nj��J�̃C���[�W�t�@�C���𗘗p���Ă̐ݒ���@���L�ڂ��܂��B
�@�@�����ݒ���I��点�ASD�J�[�h�ɃC���[�W���Ă��ăv���O�������N�����Ă���Ƃ����O��ł��B
�@�@JR1OFP�ǂ����J����Ă���C���[�W�t�@�C���́A���O�Ȃǂ̏������݂��֎~���ēr���œd����Down�����Ă��t�@�C����
�@�@���Ȃ��悤�ɏ������֎~�[�u���{����Ă��܂��̂ŁA�K���A�N��������́A�������݂�������悤�ɉ��L�R�}���h��
�@�@���{�����������B
���O����
sudo mount / -o remount,rw
JR1OFP�Ǎ쐬�̃C���[�W�t�@�C���́ASD�J�[�h�ւ̏������֎~�[�u���Ȃ���Ă��܂��̂�
�ċN���̓s�x�A��L�̃R�}���h�����{���������݉\��Ԃɂ��Ă��������B
�܂��́A�ŐV�̏�Ԃɂ��܂��B
sudo apt-get update
sudo apt-get upgrade
�P��ڂ́A�P�W�����炢������܂��B�C���ɑ҂��܂��傤�B
Errors were encountered while processing:
dhcpcd5
E: Sub-process /usr/bin/dpkg returned an error code (1)���o�܂��B
����́A���Ԃ�A���̃C���[�W�t�@�C����wifi�W�̐ݒ�������N���g���ēǂݍ��ނ悤�ɂ��Ă��邩�炾��
���@���Ă��܂��B
�����ƁADHCPCD�͓����Ă��܂��̂ŋC�ɂ��������܂��B
���̂��Ƃ̍�Ƃł����̃G���[���o�܂����C�ɂ��������܂��傤�B
�P�DOLED�\���p�̃v���O�����̃C���X�g�[��
�ڍׂ́A�����ɋL�ڂ���Ă��܂��B
�i�P�jRPI.GPIO���C�u�����[�̃C���X�g�[��
sudo apt-get install build-essential python-dev python-pip
sudo pip install RPi.GPIO
�i�Q�jPython�W���C�u�����[�̃C���X�g�[��
sudo apt-get install python-imaging python-smbus
�ŐV��Adafruit SSD1306 Python���C�u�����̃T���v���R�[�h���_�E�����[�h
sudo apt-get install git
git clone https://github.com/adafruit/Adafruit_Python_SSD1306.git
cd Adafruit_Python_SSD1306/
sudo python setup.py install
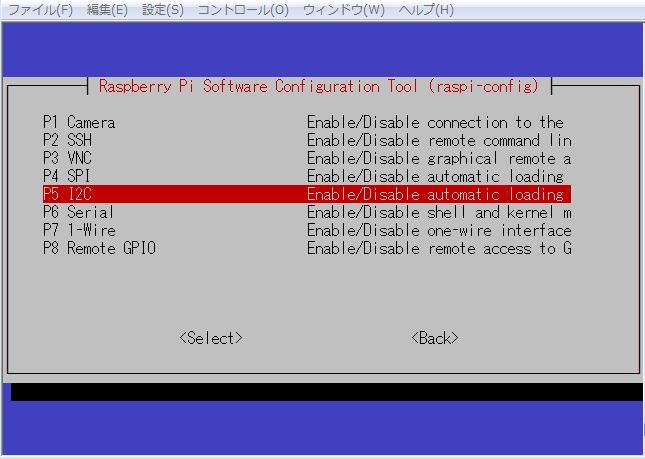
�i�R�jOLED�𗘗p���邽��i2c�̗L����
sudo raspi-config
5 Interfacing Options Configure connections to peripherals
P5 I2C Enable/Disable automatic loading of I2C kernel module
The ARM I2C interface is enabled�Ƃ��܂�
��x�ċN��
sudo reboot
�ċN��������K�����L�R�}���h�ŏ������������Ă��������B
���������ݒ肵�Ă��������߂Ȃ��Ɠ{���܂���B
sudo mount / -o remount,rw
JR1OFP�ǂ����J���Ă���Ă���C���[�W�t�@�C���́A�ˑR�̓d��OFF�Ȃǂ�
OS�����Ȃ��悤�ɏ������֎~���{����Ă��܂��̂ŁA�ċN��������K��
���̍�Ƃ�Y��Ȃ��悤�ɂ��Ă��������B
i2c�L�����̊m�F
sudo i2cdetect -y 1
PiOLED�̃A�h���X0x3c���\�����ꂽ�̂��m�F���܂�
0 1 2 3 4 5 6 7 8 9 a b c d e f
00: -- -- -- -- -- -- -- -- -- -- -- -- --
10: -- -- -- -- -- -- -- -- -- -- -- -- -- -- -- --
20: -- -- -- -- -- -- -- -- -- -- -- -- -- -- -- --
30: -- -- -- -- -- -- -- -- -- -- -- -- 3c -- -- --
40: -- -- -- -- -- -- -- -- -- -- -- -- -- -- -- --
50: -- -- -- -- -- -- -- -- -- -- -- -- -- -- -- --
60: -- -- -- -- -- -- -- -- -- -- -- -- -- -- -- --
70: -- -- -- -- -- -- -- --
�i�S�j�\���v���O�����N��
cd Adafruit_Python_SSD1306/
sudo python examples/stats.py
IP�A�h���X�ACPU�g�p���A�������[�g�p���A�f�B�X�N�g�p�ʂ��\������܂��B
ctrl+z�Ŕ����܂��B
�Q�D�t�H���g��ύX���ĕ\�����e���ύX
�{����ύX����̂Ŋ��邱�Ƃ��Ȃ���������܂���
���{��t�H���g�����Ă݂܂��B
�i�P�j�t�H���g���C���X�g�[��
sudo apt install fonts-ipafont
�C���X�g�[�����ꂽ�t�H���g�́A/usr/share/fonts���ɂ���܂�
pi@raspberrypi:/usr/share/fonts/opentype/ipafont-gothic $ ls -l
total 12184
-rw-r--r-- 1 root root 6235712 Apr 12 2011 ipagp.ttf
-rw-r--r-- 1 root root 6235344 Apr 12 2011 ipag.ttf
pi@raspberrypi:/usr/share/fonts/opentype/ipafont-mincho $ ls -l
total 15720
-rw-r--r-- 1 root root 8046048 Apr 12 2011 ipamp.ttf
-rw-r--r-- 1 root root 8046712 Apr 12 2011 ipam.ttf
�i�Q�jstats.py�ݒ�t�@�C���Őݒ��ύX���܂��B
cd ~/Adafruit_Python_SSD1306
sudo nano examples/stats.py
�@�t�H���g��ύX
100�s��
# Load default font.
font = ImageFont.load_default()
�����L�̂悤�ɕύX���܂��B
font = ImageFont.truetype("fonts-japanese-gothic.ttf", 14)
�A����v���O�����삳���܂�
104�s�ڂ̑O������L�̂悤�ɂ��āA��x�����ݒ��ǂݍ��ݕ\������悤��
���܂��B�{���́A���b�����ɓǂݍ��݂��s��Ȃ��ƈӖ����Ȃ��̂ł���
NoraGateway�Ɠ����ɍs����CPU���p����100���߂��ɂȂ�P��������������̂�
���̂悤�ɍs���܂��B
�v���O������1��Œ�~��������@�ɂ��ẮAJG3EBB�ǂɃA�h�o�C�X���܂����B
�܂��AJumbospot��OLED�́Ashutdown���Ă��\���������܂���B
�{���ɍċN�������̂��킩��Ȃ��̂ŁA�d�����Ȃ��Ă�reboot�ŕ\������x
�����悤�ɂ���V�F���X�v���N�g�������Ē����܂����B�{���ɂ��肪�Ƃ��������܂����B
i=1
while True:
if i > 2 :
break
i = i+1
python�̕��@�ɂ̂��Ƃ�X�y�[�X�̐��͍��킹�ĉ������B
if i > 2 :�́@���p�X�y�[�X���O�ɂS�ł��B
break�́A���p�X�y�[�X���O��8����܂��B
i = i+1�́A���p�X�y�[�X���O�ɂS����܂��B
���ꂪ����Ȃ��ƃG���[���o�܂��B�����A�K���ɃX�y�[�X�����Ă���
���т���{���܂����B�i�O�O�G
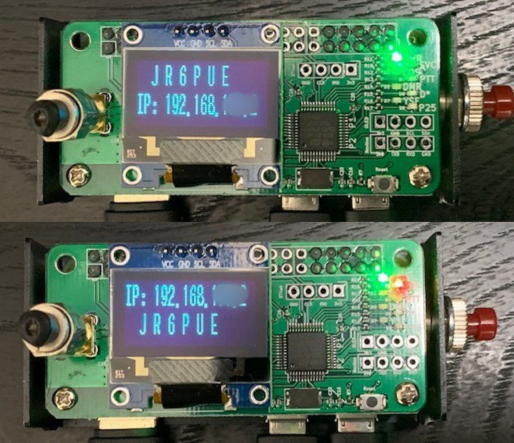
�BIP�A�h���X�Ǝ����̃R�[���T�C�����o��悤�ɐݒ肵�܂��B
CPU�ғ����ADISK���p�Ƃ��́A��x���������ǂݍ��܂Ȃ��̂ňӖ���
�Ȃ��܂���B�t�H���g�̃T�C�Y��{�ɂ��邽�߂����͕\�����Ȃ��悤��
�R�����g�A�E�g���܂��BIP�A�h���X������ǂݍ��ނ悤�ɂ��܂��B
# Shell scripts for system monitoring from here : https://unix.stackexchang$
cmd = "hostname -I | cut -d\' \' -f1"
IP = subprocess.check_output(cmd, shell = True )
cmd = "top -bn1 | grep load | awk '{printf \"CPU Load: %.2f\", $(NF-2)}'"
CPU = subprocess.check_output(cmd, shell = True )
cmd = "free -m | awk 'NR==2{printf \"Mem: %s/%sMB %.2f%%\", $3,$2,$3*100/$2$
MemUsage = subprocess.check_output(cmd, shell = True )
cmd = "df -h | awk '$NF==\"/\"{printf \"Disk: %d/%dGB %s\", $3,$2,$5}'"
Disk = subprocess.check_output(cmd, shell = True )
111�s�ڈȍ~�̏�L�ݒ�����L�̂悤�ɃR�����g�A�E�g���܂��B
# Shell scripts for system monitoring from here : https://unix.stackexchang$
cmd = "hostname -I | cut -d\' \' -f1"
IP = subprocess.check_output(cmd, shell = True )
# cmd = "top -bn1 | grep load | awk '{printf \"CPU Load: %.2f\", $(NF-2)}'"
# CPU = subprocess.check_output(cmd, shell = True )
# cmd = "free -m | awk 'NR==2{printf \"Mem: %s/%sMB %.2f%%\", $3,$2,$3*100/$2$
# MemUsage = subprocess.check_output(cmd, shell = True )
# cmd = "df -h | awk '$NF==\"/\"{printf \"Disk: %d/%dGB %s\", $3,$2,$5}'"
# Disk = subprocess.check_output(cmd, shell = True )
���ɁA�\������ݒ�Ŏ����̃R�[���T�C����\������悤�ɂ��܂��B
# Write two lines of text.
draw.text((x, top), "IP: " + str(IP), font=font, fill=255)
draw.text((x, top+8), str(CPU), font=font, fill=255)
draw.text((x, top+16), str(MemUsage), font=font, fill=255)
draw.text((x, top+25), str(Disk), font=font, fill=255)
�������A��L�\�L�����L�̂悤�ɕύX���܂��B����ŁA�t�H���g���傫���Ȃ�
IP�A�h���X�Ǝ����̃R�[���T�C�����\�������悤�ɂȂ�܂��B
# Write two lines of text.
draw.text((x, top+3), "IP: " + str(IP), font=font, fill=255)
# draw.text((x, top+16), str(CPU), font=font, fill=255)
# draw.text((x, top), str(MemUsage), font=font, fill=255)
draw.text((x, top+17), u' J R 6 P U E', font=font, fill=255)
���������̃R�[���T�C���ɂ��܂��B
�O�̃X�y�[�X�́A�\����������OLED�̐^�ɕ\������悤�ɔ��p�X�y�[�X��2����܂����B
�R�D�����N���̐ݒ���s���܂��B
/etc/rc.local�̍ŏI�s��exit 0�̑O�ɁA�ȉ��̂悤�ɒNjL���܂��B
sudo nano /etc/rc.local
# Wi-Fi Setting
# wfparacp.sh
# IP Adress Setting
# dhcpcd.sh
sudo python /home/pi/Adafruit_Python_SSD1306/examples/stats.py
exit 0
�ۑ����܂��B
�S�Dreboot��������OLED�̕\������x�����悤�ɂ��܂��B
����ȉ��̃V�F���X�v���N�g�́AJG3EBB�厛OM�ɋ����Ē����܂����B
���肪�Ƃ��������܂����B
cd /home/pi
�i�P�jclr_oled.sh���쐬
sudo nano clr_oled.sh
���L���e���L�ڂ��܂�
#!/bin/bash
sudo killall python
sleep 1
cd /home/pi
sudo python clr_oled.py
�ۑ�
sudo chmod 777 clr_oled.sh
�i�Q�jclr_oled.py���쐬
sudo nano clr_oled.py
���L���e���L�ڂ��܂�
#************** clr oled python****************
import time
import Adafruit_GPIO.SPI as SPI
import Adafruit_SSD1306
from PIL import Image
from PIL import ImageDraw
from PIL import ImageFont
import subprocess
# Raspberry Pi pin configuration:
RST = None # on the PiOLED this pin isnt used
# Note the following are only used with SPI:
DC = 23
SPI_PORT = 0
SPI_DEVICE = 0
# 128x32 display with hardware I2C:
disp = Adafruit_SSD1306.SSD1306_128_32(rst=RST)
# 128x64 display with hardware I2C:
# disp = Adafruit_SSD1306.SSD1306_128_64(rst=RST)
# Initialize library.
disp.begin()
# Clear display.
disp.clear()
disp.display()
�ۑ����܂�
sudo chmod 777 clr_oled.py
�i�R�jclr_oled.service���쐬���܂�
sudo nano /etc/systemd/system/clr_oled.service
���L���e���L�ڂ��܂�
[Unit]
Description=Pronama-chan gives you to greeting when system is going to be shutdown
Before=shutdown.target alsa-store.service
DefaultDependencies=no
ConditionFileIsExecutable=/home/pi/clr_oled.sh
[Service]
Type=oneshot
ExecStart=/home/pi/clr_oled.sh
[Install]
WantedBy=shutdown.target
�ۑ����܂��B
�S�D�T�[�r�X�̎����N���ݒ�
sudo systemctl enable clr_oled.service
sudo systemctl start clr_oled.service
�T�DOLED�̏Ă��t���h�~
OLED�����������������ƕ\�����Ă���ƏĂ��������ł��B
�Ƃ͌����Ă��ǂꂭ�炢�̎��ԂŏĂ����̂��͂킩��܂���B
1�T�Ԓ��x�ł͖��Ȃ��悤�ł����A�C�x�ߓI��crontab���g����
IP�A�h���X�ƃR�[���T�C�����㉺����ւ���悤�ɂ������Ǝv���܂��B
�i�P�j�ݒ�p�t�@�C����2�ɂ��܂�
�܂��A/home/pi/Adafruit_Python_SSD1306/examples/stats.py�t�@�C����������쐬���܂��B
cd /home/pi/Adafruit_Python_SSD1306/examples/
cp stats.py stats1.py
sudo nano stats1.py
# Write two lines of text.
draw.text((x, top+3), "IP: " + str(IP), font=font, fill=255)
# draw.text((x, top+8), str(CPU), font=font, fill=255)
# draw.text((x, top+16), str(MemUsage), font=font, fill=255)
draw.text((x, top+17), u' J R 6 P U E', font=font, fill=255)
�������㉺�t�]�����܂��B
# Write two lines of text.
draw.text((x, top+17), "IP: " + str(IP), font=font, fill=255)
# draw.text((x, top+8), str(CPU), font=font, fill=255)
# draw.text((x, top+16), str(MemUsage), font=font, fill=255)
draw.text((x, top+3), u' J R 6 P U E', font=font, fill=255)
�i�Q)crontab�Ŗ���0����30���ŏ㉺�����ւ���悤�ɐݒ肵�܂��B
cron��pi�ő��点�܂��̂�sudo�R�}���h�͎g���܂���
$ crontab -e
no crontab for root - using an empty one
Select an editor. To change later, run 'select-editor'.
1. /bin/ed
2. /bin/nano <---- easiest
3. /usr/bin/vim.basic
4. /usr/bin/vim.tiny
Choose 1-4 [2]:
�G�f�B�^�[�͉����g�����Əo�܂��̂ŁA2�Ԃ��f�t�H���g��nano�����͐ݒ肵�܂����B
# m h dom mon dow command
00 * * * * sudo python /home/pi/Adafruit_Python_SSD1306/examples/stats.py
30 * * * * sudo python /home/pi/Adafruit_Python_SSD1306/examples/stats1.py
�ۑ�
�Ƃ肠�����A�ړI�̎����o���܂����B�i2019.03.23�j
